

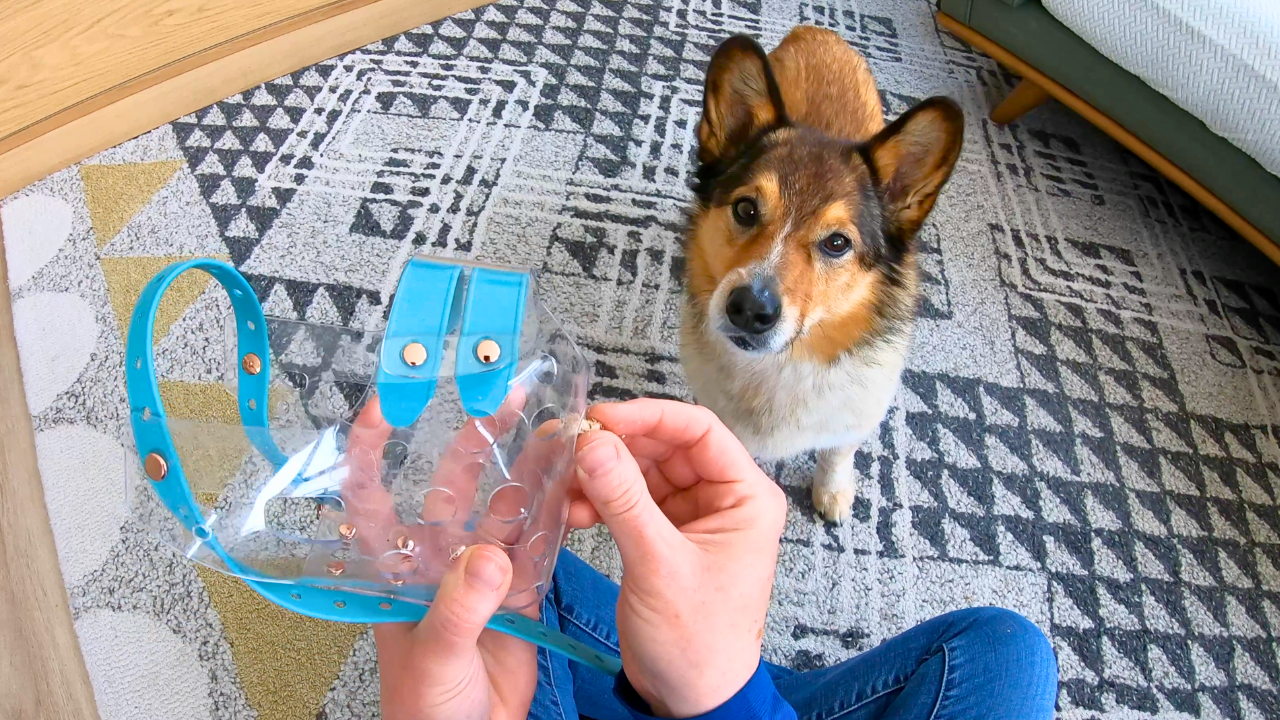



Whether your dog needs to wear a muzzle for veterinary visits, grooming, safety, or another reason, taking the time to properly muzzle train your dog can make an enormous difference in how good they feel about wearing one.
Rather than just tolerating their muzzle, we want our dogs to feel comfortable and confident putting their own faces into their muzzle and wearing it during everyday activities.
That’s where proper muzzle conditioning comes in.
In this guide, I’m going to show you how to break the muzzle training process into small, manageable steps to help your dog build a positive association with each part of the experience.
But successful muzzle conditioning involves more than simply following a prescribed number of repetitions. You need to learn how to read the cues your dog is showing you throughout the process, so that you understand when your dog is ready to progress.
There will be moments when your dog hesitates or seems confused, and you need to know what to do next. There are subtle changes in body language to watch for, and seemingly small handling mistakes that can make a big difference in how comfortable your dog ultimately becomes wearing their muzzle.
That’s why I’ve included not only the training instructions, but also troubleshooting advice, common mistakes to avoid, a free resource on understanding your dog’s body language, and criteria checklists for deciding when your dog is ready to progress.
Suggested: Watch The Muzzle Training Video
While this written guide provides the step-by-step instructions, I highly recommend watching the accompanying video as well.
I’ve filmed the entire muzzle conditioning process with Neirah, a dog that’s never seen a muzzle.
You’ll see our actual muzzle training sessions, including moments when Neirah hesitates, handling mistakes I make, and how I adjust the exercises when something isn’t working.
The video and written guide are designed to work together. The written instructions give you something to refer back to as you train, while the video helps you recognize the subtle body-language changes and handling details that can be difficult to explain in words alone.
🎥 Watch: How to Muzzle Train Your Dog (Step-by-Step Muzzle Conditioning Tutorial)
The 10 Steps of Muzzle Conditioning
Both this written guide and the accompanying video follow the same 10-step muzzle conditioning process:
- Build positive associations with the muzzle.
- Teach your dog that the muzzle predicts food.
- Reward voluntary interactions with the muzzle.
- Teach your dog to voluntarily insert their face into the muzzle.
- Add a verbal cue and begin building duration.
- Remove the food lure and build duration before rewarding.
- Condition the straps and their movement separately.
- Combine face insertion with moving the straps around the head.
- Briefly buckle the muzzle and gradually fade the lure.
- Further duration and transition to everyday life.
Important: These are training stages, not ten individual training sessions. Your dog might progress through one step in a few minutes and need several days for another. Your dog determines the timeline!
Before You Begin: Setting Your Dog Up for Muzzle Training Success
1. Choose an Appropriate Muzzle
Before you begin muzzle training, make sure you’ve selected a muzzle that’s appropriate for your dog’s size, shape, and intended use.
You’ll want a properly fitted basket-style muzzle that allows your dog to open their mouth sufficiently to pant, breathe comfortably, and receive treats.
Baskerville muzzles are a popular off-the-shelf option, but they may not be the best fit for every dog.
If your dog will be wearing a muzzle regularly or for extended periods (and your budget allows) it’s worth considering a custom-fitted muzzle. A custom muzzle can provide a more comfortable fit, particularly for dogs whose face shape doesn’t suit standard muzzle designs. Two great custom made muzzle options include Mia’s Muzzles and The Muzzle Movement.
Whatever muzzle you choose, proper fit is essential. Your dog should have adequate room to pant, and the muzzle shouldn’t rub or press uncomfortably against their face.
Please keep in mind that a muzzle is a safety and management tool; it doesn’t replace training, supervision, or addressing the underlying reason your dog needs to wear one.
2. Prepare Your Training Environment and Rewards
Start somewhere quiet and familiar, where your dog feels comfortable and isn’t competing with distractions.
You’ll need:
- Your dog’s muzzle
- A previously taught marker word (more on that in #4)
- Plenty of small, appealing food rewards*
- A small bowl or container for treats
- Some wet food or another suitable spreadable reward for later steps
- A towel for the messier exercises!
*I often used my dog’s regular food for the easier exercises, but you can choose something more appealing if your dog needs additional motivation.
3. Learn to Recognize Your Dog’s Body Language
This is one of the most important parts of the entire process.
Throughout muzzle conditioning, you’ll need to watch for signs that your dog is comfortable, confused, hesitant, or worried. Signs may include:
- Slowing down or hesitating when approaching the muzzle
- Leaning or moving away
- Becoming unusually still or tense
- Changes in ear position, facial expression, or posture
- Avoiding the muzzle or pulling their face out
Remember that body language needs to be interpreted in context. For example, lip licking might indicate discomfort, but a dog anticipating a delicious treat might also lick their lips. Likewise, a wagging tail doesn’t automatically mean a dog is happy.
Look at the whole dog, the situation, and changes from what’s normal for your individual dog.
If you’re following along with the video tutorial, I explain signs of stress and hesitation to watch for throughout the training process.
To help you better understand how to read your dog’s body language, I’ve also put together a separate free dog body-language resource featuring educational videos, photographs, and illustrations that I recommend exploring.

My favourite practical tip: Film your training sessions and watch them back! Watching your footage can make subtle changes in your dog’s behaviour much easier to notice.
4. Understand How to Use a Marker Word
Throughout this guide, you’ll see me use the word “Yes!” That’s my marker word.
A marker identifies the precise moment your dog performs the behaviour you want to reinforce, and it promises that a reward is coming.
For example, if I say “Yes!” the instant Neirah touches the muzzle with her nose, I’m communicating that touching the muzzle was the behaviour that earned her reward.
If you haven’t taught your dog a marker word before, I’d recommend doing that first.
🎥 Watch: How to Use a Marker Word for Dog Training (and Get Better Results)
5. Let Your Dog Set the Pace
I know how tempting it is to rush through the early exercises because you want to get to the part where your dog is actually wearing their muzzle, but those early steps are the foundation for everything that follows.
Slow is fast with muzzle conditioning!
If your dog hesitates, becomes worried, or starts avoiding the exercise, don’t assume they simply need more repetitions at the same difficulty. Instead, make the exercise easier.
That might mean moving the muzzle farther away, returning to an earlier step, shortening the duration, or breaking the exercise into smaller pieces.
You won’t ruin muzzle conditioning by taking your time, but pushing too quickly can create exactly the negative associations you’re trying to avoid.
Let’s begin muzzle training!
Step 1: Build Positive Associations to the Muzzle
🎥 Watch this step HERE
We’re going to start with the muzzle on the ground, rather than in your hand.
This gives your dog the opportunity to investigate it in a less intimidating way at their own pace.
How to Train This Step
- Place the muzzle on the ground in a quiet area.
- Scatter a couple treats around it.
- Allow your dog to approach and collect the treats at their own pace.
- Next, toss a treat away from the muzzle, giving your dog the opportunity to move away.
- Repeat, watching how comfortably your dog moves toward and away from the muzzle.
If your dog has never seen a muzzle before, they may treat it like any other neutral object and have no hesitation approaching it. But if they’ve had a prior unpleasant experience with a muzzle, they may be more cautious.
How to Recognize Hesitation
One of my favourite ways to assess your dog’s comfort is to compare how they move toward the muzzle with how they move toward a treat tossed away from it.
Are they equally enthusiastic in both directions?
Or do they move quickly toward the treat away from the muzzle, then slow down when approaching the one next to the muzzle?
That difference can be a subtle sign that your dog isn’t completely comfortable.
If you notice hesitation, move the treats farther away from the muzzle and work at a distance where your dog can approach comfortably.
We don’t want your dog to feel like they have to approach something frightening to access food.
How to Know You’re Ready for Step 2
Your dog should:
- Approach the muzzle easily and voluntarily.
- Show relaxed body language around it.
- Show no hesitation interacting with the muzzle or collecting treats nearby.
If your dog was neutral toward the muzzle initially, this may take just one session. If they have an existing negative association, expect to spend longer here.
Step 2: Teach Your Dog That the Muzzle Predicts Treats
🎥 Watch this step HERE
In Step 1, we used food around the muzzle to begin creating positive associations. When we repeatedly pair something our dog likes, such as food, with something they’re neutral or unsure about, like the muzzle, their emotional response to the muzzle can begin to change.
Rather than being meaningless (or even worrying) the muzzle starts to predict something enjoyable!

Now we’re going to make the relationship between the muzzle and food even clearer.
We want the appearance of the muzzle to predict that something good is about to happen.

How to Train This Step
- Hold the muzzle behind your back, out of your dog’s sight.
- Bring it into view.
- Wait for your dog to look at the muzzle.
- Mark that moment with “Yes!”
- Deliver a treat.
- Hide the muzzle behind your back and repeat.
Pay attention to what your dog is looking at.
You want to mark when they notice the muzzle, not when they look at your face or the bowl of treats beside you.
What If Your Dog Seems Worried?
If your dog backs away, becomes tense, or shows other signs of discomfort when you show the muzzle, make the exercise easier.
You might hold the muzzle farther away from your dog, place it on the ground rather than in your hand, or return to Step 1.
How to Know You’re Ready for Step 3
Your dog should show a comfortable, positive, anticipatory response when they see the muzzle appear. Ideally, seeing it has become a happy prediction that food is on the way!
Step 3: Reward Voluntary Muzzle Interactions
🎥 Watch this step HERE
Now we’re going to start rewarding your dog for actively interacting with the muzzle.
We’ll gradually progress from rewarding simple glances to actually voluntarily approaching and touching the muzzle with their nose.
How to Train This Step
Start with the muzzle on the ground if that’s easiest for your dog.
- Wait for your dog to look toward the muzzle.
- Mark “Yes!” and reward.
- After a few successful repetitions, start waiting for a little more engagement, such as moving toward the muzzle.
- Gradually progress toward your dog touching the muzzle with their nose, rewarding each progressive interaction.
- Once they’re comfortable, repeat with the muzzle held in your hand.
You can occasionally toss a treat away to reset the exercise and give your dog another opportunity to approach voluntarily.
An Important Handling Mistake to Avoid
Don’t move the muzzle toward your dog’s face to get them to interact with it.
We want the dog approaching the muzzle, not the muzzle approaching the dog.
This sounds straightforward, but it’s incredibly easy to start extending your arm without realizing it (you’ll even catch me doing it accidentally in the video tutorial!).
One tip I give clients is to rest the back of their hand against their leg while holding the muzzle. It’s a tactile reminder that helps you keep it still.
What If Your Dog Gets Confused?
As you increase your expectations, your dog might offer a behaviour that previously earned a reward, such as looking at the muzzle, and seem a little confused when it no longer works.
That’s normal! If they become stuck, briefly lower your criteria and reward an easier interaction again.
If they lose focus, you can also draw their attention back to the muzzle with a small movement (provided doing so doesn’t worry them).
The goal isn’t to make your dog guess endlessly. It’s to help them understand the progression while keeping the experience positive.
How to Know You’re Ready for Step 4
Your dog should willingly approach the muzzle in your hand and comfortably touch it with their nose, without signs of stress or hesitation.
Step 4: Teach Your Dog to Put Their Face in the Muzzle
🎥 Watch this step HERE
It’s now time to begin teaching your dog to put their face inside the muzzle.
For this step, I use a food lure.
That means positioning a treat so your dog follows it into the muzzle voluntarily.
How to Train This Step
- Hold the muzzle still, with the straps moved out of the way.
- Position a treat so your dog can reach it by putting their face into the muzzle.
- Allow them to move toward the treat and insert their face voluntarily.
- Mark and reward while their face is inside.
- Remove the muzzle to keep the insertion brief.
- Toss a treat away to reset before repeating.
Initially, you’re looking for just a quick, comfortable insertion, not a long hold.
Watch Out for Conflict
Food lures are useful, but they come with an important consideration:
A dog might want the treat badly enough to push themselves into a situation they’re not actually comfortable with.
That’s why you need to keep watching their body language.
If your dog hesitates, try positioning the reward closer to the opening so they only need to insert their nose a little way.
You can gradually increase how far they put their face inside as their confidence grows.
An Alternative for Hesitant Dogs
If your dog seems uncomfortable with you holding the muzzle, try resting it in a small bowl or dish. The dish supports the muzzle so your dog can approach it and insert their face without you holding it. Place a treat inside, let your dog retrieve it, and toss another treat away before repeating.
Once they’re comfortable with that arrangement, you can work toward holding the muzzle in your hand.
Two Mistakes to Avoid
1. Moving the muzzle onto your dog’s face.
Continue to hold it still. If your dog crowds you, toss a treat away so they can approach from a little distance.
2. Rewarding after your dog has withdrawn their face.
At this stage, we want to build the association between having their face inside the muzzle and receiving food. Try to deliver the reward while their face is still inside.
Why I Save Lickable Rewards for Later
You may have seen recommendations to smear peanut butter or another lickable treat inside the muzzle. I find that helpful later, when we’re building duration. But right now, I prefer small treats or kibble because I want the exercise to be a quick, low-pressure insertion, not something where the dog needs to hold their face inside for a longer duration working on a lickable reward.
How to Know You’re Ready for Step 5
Your dog should comfortably and voluntarily insert their face into the muzzle, without hesitation or signs of stress.
Step 5: Add a Muzzle Cue & Build Duration
🎥 Watch this step HERE
Once your dog is confidently putting their face into the muzzle, we’re going to introduce two new elements:
- A verbal cue that tells your dog when to insert their face.
- A slightly longer period of keeping their face inside while receiving continuous rewards.
Why I Teach a Verbal Muzzle Cue
This is something I do a little differently from many muzzle-training tutorials.
I like to teach face insertion as a distinct, cued behaviour, with the word “muzzle” meaning: put your face into the muzzle.
This tells my dog exactly when I’m asking them to insert their face, rather than leaving them to guess whether they’re supposed to offer that behaviour every time they see the muzzle.
Reducing ambiguity and increasing predictability can be particularly helpful for sensitive or anxious dogs.
Teaching face insertion as a separate, cued behaviour also allows me to work on other components of muzzle conditioning—such as duration and comfort with the straps—independently, without my dog repeatedly trying to insert their face when I’m not asking them to.
How to Train This Step
- Hold the muzzle still, with a food lure ready.
- Say your chosen cue, such as “muzzle,” immediately before using the food lure to guide your dog into the muzzle.
- Continue delivering food while their face remains inside.
- Aim to gradually build toward ~5 seconds of comfortable insertion.
- Remove the muzzle when the food is finished.
Tip: During this step your dog is still receiving a continuous stream of rewards. We’re not asking them to hold their face inside without food yet.
Two Ways to Deliver Continuous Rewards
You can offer several small treats one after another while your dog’s face remains inside, or you can smear a little lickable food inside the muzzle for them to lick.
I often prefer wet food because it makes it easier to maintain a continuous reward.
Note: If you choose peanut butter, make sure it contains no xylitol or other unsafe ingredients. Personally, I find wet dog food easier to use because peanut butter can be sticky and distracting.
Gentle Reminder: Let Your Dog Approach the Muzzle
Continue watching your handling! In my own training footage, I caught myself lowering the muzzle toward Neirah instead of letting her approach it. Even after years of training dogs, this is an easy mistake to make!
How to Know You’re Ready for Step 6
Your dog should:
- Be developing a clear association between your verbal cue and face insertion.
- Insert their face willingly, without hesitation.
- Remain comfortably inside for 5+ seconds while receiving continuous rewards.
Step 6: Fade the Food Lure & Build Duration Before Rewarding
🎥 Watch this step HERE
This step is particularly important because it helps us check whether our dog is genuinely comfortable entering the muzzle without a lure food guiding them inside.
We’re also going to teach them to remain in position for a few seconds before their reward arrives.
Part A: Remove the Food Lure
- Hold the muzzle still, with no food lure inside or positioned in front of it.
- Keep your treats out of sight if possible.
- Say “muzzle.”
- Wait for your dog to voluntarily insert their face.
- Mark “Yes!” immediately when they do.
- Deliver several treats while their face remains inside.
- Remove the muzzle before resetting for another repetition.
If your dog seems confused, don’t panic. Neirah initially hesitated when I removed the lure, too. She wasn’t showing signs that she feared the muzzle. Instead, she seemed unsure about what I wanted now that the familiar food lure was missing.
After a few repetitions, her responses became much quicker.
Remember that confusion and fear aren’t the same thing. Look at your dog’s overall body language when deciding how to respond!
Part B: Gradually Delay the Reward
Once your dog is confidently entering without a lure, we’re going to start building the time they can comfortably remain and wait inside before receiving food.
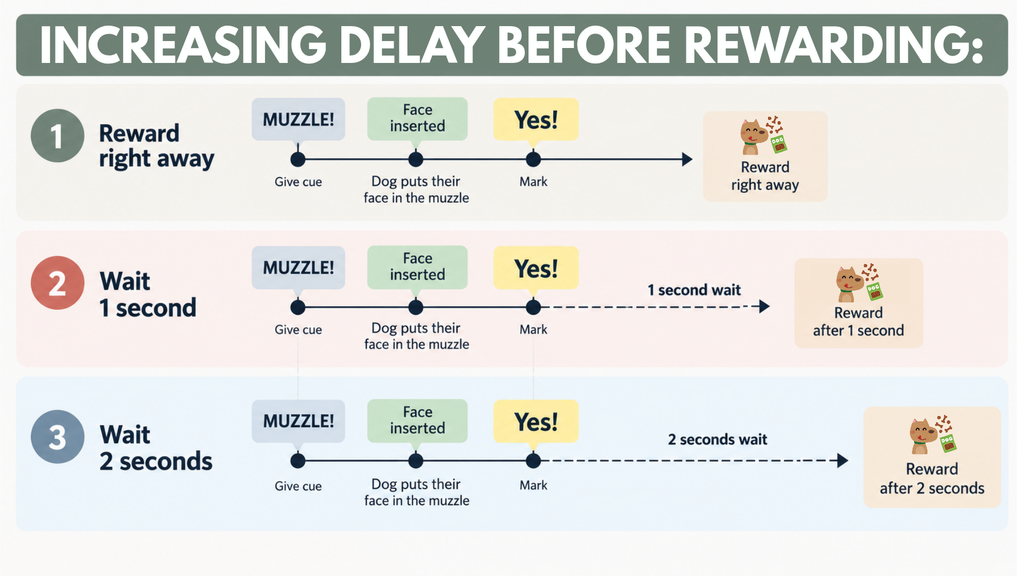
Important: I still mark for successful face insertion immediately, but now I gradually delay the delivery of the reward.
For example:
- Say “muzzle.” Your dog inserts their face. Mark “Yes!” and reward immediately.
- On another repetition, mark insertion immediately, then wait approximately one second before delivering the treat.
- On a later repetition, mark immediately and wait two seconds.
- Gradually work toward approximately three to five seconds, provided your dog remains comfortable.
Why do I do it this way? I want the verbal cue to have a clear action from the dog: put your face into the muzzle.
My marker word tells the dog they’ve performed that action correctly. Then I separately build their comfort with remaining in that position while waiting for food.
This becomes especially useful when we begin working with the straps!
What If Your Dog Pulls Their Face Out of the Muzzle?
If your dog withdraws before you deliver the reward, make the next repetition easier.
For example, if they struggled with a three-second wait, try rewarding after two seconds (or sooner).
A Common Handling Mistake That Can Undermine Muzzle Duration
There’s one mistake I occasionally catch myself making still. I reward the dog for inserting their face, then immediately toss another treat away as a reset while their face is still inside the muzzle.
Of course, the dog pulls their face out to chase the treat. The mistake aspect is that you’ve accidentally rewarded the dog for face removal, which can impact how well they progress at hold durations.
Instead:
- Reward your dog while their face is inside.
- Remove the muzzle from their face.
- Then toss a treat away to reset.
This helps keep the end of the exercise clear.
How to Know You’re Ready for Step 7
Your dog should:
- Insert their face into the muzzle on your verbal cue without a food lure.
- Show no hesitation approaching or entering the muzzle.
- Comfortably keep their face inside for approximately five seconds without continuous food delivery.
Step 7: Get Your Dog Comfortable with Muzzle Straps
🎥 Watch this step HERE
For many dogs, the straps are one of the most challenging parts of muzzle training, and that makes sense! Having something move around their head and neck can feel very different from voluntarily putting their face into an open muzzle.
I like to break this step into two parts.
Part A: Check Your Dog’s Response to the Strap Sounds
Some dogs are sensitive to the sound of the buckle, clips, or straps moving.
Before practising the fastening process, test your dog’s reaction to those sounds separately.
Start at a comfortable distance and gently make the relevant sound.
Watch for changes in body language, such as:
- Moving away
- Becoming tense or still
- Changes in ear position
- Lip licking accompanied by other signs of concern
- Hesitating to approach again
If your dog is worried by the sound, condition it separately before continuing.
I’ve created a tutorial demonstrating how I approach sound conditioning that I’ll link here.
🎥 Watch: Dog’s Scared of Thunder, Fireworks, or Other Noises? Try Sound Conditioning!
When your dog seems comfortable with the muzzle sounds, you can move on to Part B.
Part B: Condition Strap Movement Without Face Insertion
Here’s another reason why teaching the verbal muzzle cue earlier becomes particularly helpful.
Since Neirah understands that “muzzle” specifically asks her to insert her face, she doesn’t try to automatically stick her face inside before hearing the cue. This means I can practise the straps without her trying to put her face inside at the same time.
That lets us work on one potentially uncomfortable sensation at a time, and I’ve found with clients it really helps the conditioning process.
How to Train This Part
- Hold the muzzle in your hands, but don’t cue your dog to insert their face.
- Gently begin lifting or moving the straps toward their head and neck.
- Reward while the straps are in position.
- Lower the straps and reset.
- Gradually progress toward the full movement of the straps wrapping around your dog for a few seconds.
Remember to reward while the straps are around your dog!
Don’t wait until you’ve removed the straps to deliver the reward. We want your dog to associate the straps being around their head and neck with good things happening. If the reward only arrives after the straps disappear, we’re not creating the association we intended.
How to Know You’re Ready for Step 8
Your dog should remain relaxed and comfortable while you move the straps around their head and neck, without hesitation, avoidance, or signs of stress.
Step 8: Combine Face Insertion + Strap Movement
🎥 Watch this step HERE
Now that your dog is comfortable with face insertion and strap movement separately, we’re going to begin combining them.
We’re still not buckling the muzzle!
For now, we simply want your dog to remain comfortable with their face inside while you lift and move the straps around their head and neck briefly.
Start with a Hands-Free Muzzle Rest Setup
One of the challenges with this step is that you need your hands to move the straps.
If you’re holding the muzzle in one hand, releasing it to reach around your dog’s head can cause the muzzle to shift. Some dogs find that additional movement uncomfortable, so it’s something I progress towards rather than starting with.
Instead, I often begin with a hands-free setup, as demonstrated in the video tutorial.
Two options for this include:
Option 1: Support the muzzle in a bowl or dish.
Position the muzzle so your dog can comfortably insert their face while you use both hands to move the straps.
Option 2: Hold the muzzle between your knees.
This is my preferred method.
It supports the muzzle while keeping your hands available, and it can make the eventual transition to holding the muzzle more natural since you were the one supporting the muzzle.
How to Train This Step
- Prepare a little wet food (or other lickable item) inside the muzzle to provide continuous rewards.
- Position the muzzle in your chosen hands-free setup.
- Say your verbal “muzzle” cue.
- Allow your dog to insert their face voluntarily.
- While they’re receiving food, gently lift and move the straps around their head and neck.
- Lower the straps and remove the muzzle before the continuous reward runs out.
- Repeat, gradually building your dog’s comfort.
At first, keep the insertion & strap movement brief. We want to make this combination feel easy!
Progress Toward Holding the Muzzle:
Once your dog is comfortable with the hands-free version, try holding the muzzle normally.
After your dog inserts their face, you’ll need to release your supporting hand and move it around to help position the straps.
That creates a little more movement than the hands-free version, so watch your dog’s body language carefully.
If they become stiff, lean away, or try to withdraw, return to the easier setup for a few more repetitions.
An Important Check After Using a Food Lure
At the end of advanced sessions where you’ve used wet food or another lure inside the muzzle, I strongly recommend checking that your dog is still comfortable entering without food already waiting inside.
Clean the muzzle, then do a couple of simple repetitions:
- Present the empty muzzle.
- Say “muzzle.”
- Mark your dog’s voluntary face insertion.
- Reward afterward.
This is one of my favourite ways to check whether the food lure might be masking hesitation about approaching or entering the muzzle.
A willing, comfortable response without the lure is reassuring! If your dog suddenly seems reluctant, go back a step to rebuild confidence and make the training easier.
How to Know You’re Ready for Step 9
Your dog should:
- Enter the muzzle on cue.
- Remain relaxed while you lift and move the straps.
- Keep their face inside until you remove the muzzle.
Step 9: Buckle the Muzzle & Fade the Food Lure
🎥 Watch this step HERE
We’re finally going to start fastening the muzzle and truly allowing it to rest on your dog’s face.
For many dogs, this is a significant change.
Until now, the muzzle has largely been supported by your hands or another surface.
Once you buckle it and release your support, your dog begins experiencing the full sensation of the muzzle resting on their face.
Don’t rush this step, even if everything has gone smoothly so far.
Part A: Introduce Brief Buckling with Continuous Rewards
Initially, I continue using a food lure.
- Put a little wet food inside the muzzle.
- Cue your dog to insert their face.
- Loosely fasten the buckle while they continue receiving food.
- Briefly release some of your support so they experience the muzzle resting on their face.
- Offer another reward.
- Unbuckle and remove the muzzle.
Part B: Fade the Food Lure
Once your dog is comfortable being briefly buckled while receiving continuous food, start phasing out the food lure.
Present the empty muzzle, give your verbal cue, and reward your dog after they voluntarily insert their face.
Gradually practise the buckling process with rewards delivered afterward rather than relying on food already inside.
What If Your Dog Hesitates or Pulls Their Face Out When You Remove the Lure?
This happened with Neirah during filming.
She had completed several sessions with continuous food inside the muzzle, and I thought she might be ready to progress.
But when I removed the lure and tried the next version, she showed hesitation and face removal.
So, I returned to the easier exercise.
It wasn’t the progression I had planned to film that day, but she told me she wasn’t ready to progress.
Your dog’s comfort determines when you’re ready to progress, not your expectations or schedule.
How to Know You’re Ready for Step 10
Your dog should willingly enter the muzzle on cue without a food lure, and remain relaxed while you buckle and unbuckle it.
Step 10: Increase the Duration Your Dog Can Comfortably Wear Their Muzzle
🎥 Watch this step HERE
At this point, your dog has learned to voluntarily enter the muzzle and remain comfortable while you fasten it.
Now we want to gradually build the amount of time they can wear it, and help them get used to it being part of everyday life.
Start with Familiar, Enjoyable Activities
Rather than fastening the muzzle and asking your dog to sit awkwardly while you watch the clock, I like to introduce activities they already know and enjoy.
For example:
- Sit
- Down
- Shake a paw
- Play Dead
- Find It
This gives your dog something familiar to focus on while they’re adjusting to the longer muzzle durations, and it also helps them become accustomed to the way the muzzle feels as they move around.
Try a “Find It” Game
One of my favourite exercises is scattering a few treats on the ground and encouraging my dog to find them. As your dog lowers their head and searches, they’ll experience the muzzle moving or pressing lightly against their face in different ways. And importantly, they’re creating those movements voluntarily.
Continue Increasing Muzzle Duration
Once your dog is comfortable moving around and doing familiar activities, you can start extending the time they wear the muzzle gradually with longer periods of muzzle wearing during activities your dog enjoys.
Eventually, you can begin transitioning toward the everyday situations where your dog actually needs to wear their muzzle.
Please don’t jump from 30 seconds of comfortable muzzle wearing in your living room to a 40-minute walk.

Increase duration in manageable increments while continuing to watch your dog’s body language.
When Is Your Dog Fully Muzzle Trained?
Rather than measuring success by whether you can physically fasten the muzzle, look at how your dog feels about the whole experience.
Ideally, your dog should:
- Willingly approach and insert their face when cued.
- Remain comfortable while the muzzle is fastened.
- Move naturally and participate in familiar activities.
- Show relaxed body language throughout the wearing period.
- Remain comfortable as you gradually introduce real-life situations.
The goal is for wearing a muzzle to become a normal, positive part of your dog’s life!
Happy training!
This guide is intended to help you build positive muzzle associations through voluntary, rewards-based training. If your dog has severe muzzle-related fear, a history of biting during handling, or urgent medical or safety needs, consider working with a qualified rewards-based professional and your veterinarian. Don’t force a frightened dog through these exercises to meet a deadline.
Disclosure: Happy Hounds uses affiliate links. Purchasing with these links will not cost you any extra, but I get commissions for purchases made through these links. Affiliate links help me to continue to offer free resources & blog posts. I would love if you used them!
How to Muzzle Train Your Dog: 10-Step Muzzle Conditioning Guide
About the author:





+ show Comments
- Hide Comments
add a comment